
Raised Patio and Solves Water Issues

Building Beautiful Raised Patios
Creating usable and beautiful space in your own backyard can be an exciting adventure as these homeowners in Calgary discovered when they decided to tackle their barren backyard. With several design factors to take into account, this total yard makeover took some very special planning. "We wanted to keep the yard open and inviting, while still being able to utilize the area to relax with family and entertain with friends". In addition to the aesthetic needs of the homeowners, there were some structural challenges that had to be addressed. One of the challenges was an existing wood retaining wall built directly against the fence line.

One of the challenges was to replace an existing wood retaining wall built directly against the fence line

"We wanted to keep the yard open and inviting, while still being able to utilize the area to relax with family and entertain with friends".

"Even though mother nature threw us for a loop and caused some delays, the project went together very smoothly" - Contractor

The wall was restricting proper drainage on the lot, causing the neighbor to have water problems every time it rained. With the help of their AB certified contractor, they were able to create a design that re-graded the lot and replaced the wood retaining wall with an Allan Block wall to address their water management issue. The contractor chose to incorporate both the AB Courtyard Collection® and AB Europa® Collection because of the ease in which the two products work together. With the retaining wall topping out at 2 feet (0.6 m) at its tallest point, the contractor recommended using the AB Barcelona blocks of the AB Europa Collection to complete the retaining wall to give the wall a low profile and keep it to scale with the rest of the yard.
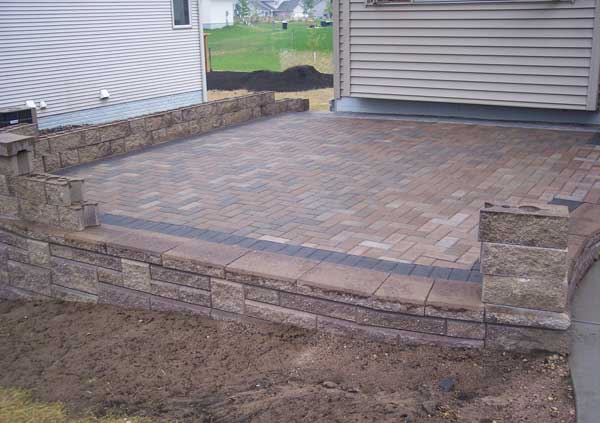
While designing the entertainment area, the contractor was able to create the look and feel the homeowner’s were looking for using the AB Courtyard Collection. The design included a beautiful patio surround that incorporated benches, posts to support a pergola and an alcove for the homeowners new spa. The adventure continued as construction began and the contractor was faced with inclement weather, battling delays due to torrential rains and blinding snow storms. “Even though mother nature threw us for a loop and caused some delays, the project went together very smoothly”, stated the contractor. The task of planning, designing and building their new outdoor living space may be over, but the next chapter of enjoying their backyard has just begun.
How to Build a Raised Patio
Want the look and feel of natural stone without the maintenance?
An Allan Block raised patio may be just what your project needs. You can incorporate curves , corners or even stairs into your patio design. Building a raised patio is easy and can add more usable living space and lasting value to your landscape.

Place the blocks on the base material near the front of the trench

Fill the hollow cores and 12 in. (300 mm) behind the block with wall rock up to the height of the block

Use a compactable rock or sand behind the entire wall. This provides a fill that is less likely to settle over time

Allan Block’s raised front lip provides a perfect edge for AB capstones, or pavers
Choose a flooring option like concrete, pavers, brick or natural stones to fit the design and style of your landscape

Once you have determined the location and design of your raised patio, stake out the location and use a string line or paint to mark out the area. A garden hose is an excellent tool for marking out curves. Then excavate the area by removing all the surface vegetation and organic materials from the area. These cannot be used as backfill material.
- Starting at the lowest point dig a base trench 24 in. (600 mm) wide by 6 in. (150 mm) deep plus 1 in (25 mm) deep for each 1 ft. (300 mm) of wall height.
- Compact the base trench as well as the entire patio base area, making a minimum of 2 passes with a walk behind plate compactor. Compaction of these areas are very important as they make up the foundation of both your wall and raised patio.
Like any other Allan Block retaining wall, your raised patio needs to have proper drainage. A drain pipe is used to prevent water pressure from building up behind the retaining wall. Place the drain pipe at the back of the trench and vent to daylight at the lowest point.
In addition to managing the water the drain pipe, you will need to manage the water flow around the house foundation (if you are building against a house). To do this you will need to waterproof the foundation wall. Check with your local building officials or with the material manufacturer on recommended installation of this waterproofing material.
To begin building the retaining wall that will make up your raised patio, start by preparing the base.
- Place the required amount of wall rock in the base trench and rake smooth.
- Compact the entire trench, then check for level making adjustments as needed.
- Starting at the lowest elevation, place the blocks on the base material near the front of the trench. Check each block for level and alignment as it is installed.
- Make minor adjustments by using a dead blow hammer or by placing up to 0.5 in. (13 mm) of course sand under the blocks. Keep in mind irregularities in the base course become larger as the wall stacks up, causing your patio to be uneven. Paying extra attention to your base will ensure your wall is level.
- Fill in the area in front of the blocks with on-site soils. This will keep the blocks from shifting while filling and compacting.
- Fill the hollow cores and 12 in. (300 mm) behind the block with wall rock up to the height of the block.
- Fill in the area behind the wall rock with approved materials for below your patio.
- Use a compactable rock or sand behind the entire wall. This provides a fill that is less likely to settle over time. Compact the entire area behind the blocks making a minimum of two passes with a walk behind plate compactor.
- Next, remove all excess material from the top of the blocks and stack your next course. Check for level and alignment and adjust as necessary.
- Then backfill the entire area behind the blocks and compact in lifts of 8 in (200 mm) or less. Make sure to use wall rock in the block cores and directly behind the retaining wall.
- From the second course and above, use a plate compactor to compact directly on top of the blocks as well as the rest of your patio area.
- Repeat these steps until you get to the desired height of your patio.**
Once the walls of your raised patio have reached the proper height it is time to place in your patio flooring. Choose a flooring option like concrete, pavers, brick or natural stones to fit the design and style of your landscape. Depending on your choice of pavement, the final course of your wall may be backfilled differently.
Check with the manufacturer of your patio flooring for proper installation instructions. Allan Block’s raised front lip provides a perfect edge for AB capstones, or pavers.
Keep in mind, a slope in the patio surface is needed to allow water and runoff to drain away from the house foundation. While a typical slope of 2% is recommended for driveways, patios can be set at a 1% slope. This will provide the balance and comfort for patio users, while still allowing for proper drainage.
Now your beautiful raised patio can be finished off with with the AB Courtyard Collection by incorporating seating walls or even a pergola.
**Taller walls may require additional reinforcement. See the retaining wall installation guide to determine if your wall will require additional reinforcement.
Excerpt from Landscape Newsletter Issue #19